Monthly Archives: March 2013

Fitout Day 13: Let there be light, and water!

What a day! We got to quite a few milestones and ‘firsts’ today with the fitout, and it feels like we’re really starting to make progress.

We had a slight lie in after stoking up the stove, and then cooked hot cross buns from a local deli and bakery, Basilia, on the stove top, having bought the last 6 yesterday for 90p. Although the stove wasn’t quite hot enough to properly toast them, they were still very nice.

image

Then we set to the kitchen with a will. The first task was to cut the lengths of worktop that go along the wall to size. Other pieces over the sides of the U shaped kitchen, covering the fridge and with a cutout to support the cooker, will be added later. It was fairly exacting doing the measuring, and after measuring and checking no less than five times, I made the first cut with the new Bosch jigsaw I had bought yesterday, the B&Q value one I had used previously being neither particularly accurate or powerful. Having clamped a piece of wood along to act as a guide, I was able to cut it fairly quickly. Cutouts for the sink and for an oak beam in one corner of the work top followed, and we were soon able to screw the worktops in place. The kitchen was starting to come together nicely.

image

The next job was to attach some battens on the edge of e worktops for the sink to sit on. The sink is designed to be used with 38mm worktops, and supports itself on two overhangs over the sides of the worktop. Because our worktop was the significantly cheaper 28mm thick variety, it would not have properly fitted, but we thought of this and had bought a couple of 10mm square section strips, to put under the lips on the sides of the sink and support it at the right height.

image

Then it was a matter of attaching up the tap and sink waste to the fittings installed earlier. Simon’s father, Ron, had helpfully made up a fitting with a sea cock and a tee to put the sink wet and the pipe from the sump in the bathroom onto. Because our skin fitting isn’t a standard domestic size, we’ve had to use a temporary flexible plastic tube, designed for overflows, which should last until we can get some better tube to replace it. After a bit of faffing with tape and jubilee clips, the waste was waterproof and working well, so it was time for the moment of truth; mount the main supply cable to the electrical panel onto the battery terminal and turn on the water pump to see if any leaks appeared.

image

Whilst the inaccessible plumbing was mercifully leak free, the Paloma annoyingly was spurting water from a drain down valve with no plug in it, so we turned off the pipe, removed the Paloma- which we were going to do anyway to cut the hole in the roof- and put on a temporary stop end on the supply pipe, so we could use the tap and sink with cold water.

This time, when the pump was turned on, we were able to use the sink freely with no leaks. The inline Jabsco filter is working well, and the water is quite free from any taint or odour and quite nice to drink.

image

The next job was to make the hole in the roof for the Paloma to exhaust through. After carefully measuring the centre of the hole in the cabin lining, which had already been cut out, I drilled through from the inside, and was then able to use a piece of wood with a screw through one end and a pencil to mark out the radius of the circle I wanted to cut. It was heavy going cutting through the 4mm steel, but the drill made it, with the addition of WD40 as makeshift cutting oil to the holes every now and then. It took about an hour to drill 25 closely spaced holes around the circumference of the circle marked out on the roof, but unfortunately just as I was using the jigsaw to start to join the holes together and complete the cut, the HSS blade snapped. Whilst there is another one, somewhere on the boat, we couldn’t find it anyway, and with it being Easter Sunday, the shops were all shut so couldn’t get more.

We had a quick walk along the cut as the sun set, and then whilst Amy was cooking a simple pasta dinner on a portable camping stove- stored in the gas locker when not in use, I don’t trust the seal on the cartridges supplied- I connected up the LED light fitting I had put up yesterday, and we were able to have a nice bright light in the kitchen to wash up by. The kitchen now looks like a kitchen, and we’ve been able to remove the food, plates and bowls, and other domestic bits and pieces from the plastic crate where it had been stored and put them away in the kitchen cupboards.
image

As mentioned, several firsts today; first running water, first working permanently wired in lights, and, first proper meal cooked on board. Already the boat is starting to feel more homely and far less like spartan camping. OK hot water still needs to come from the top of the solid fuel stove in a pan, or from the kettle whilst on the shoreline, and we can only cook on a camping stove, but it’s much, much less basic than it was.

image

Categories: Fitout, Uncategorized | 7 Comments

Fitout Day 12: On The Buses

An early start, because we had a lot of things to get from Ikea, and we wanted to beat the crowds. There were a few bits and pieces to pick up that hadn’t been available for the kitchen order such as drawer fronts, we had the carousel unit from the corner cabinet we couldn’t use to return for a £50 refund, and a lot of storage items to get for the kitchen. We wanted to make the most of the Ikea being close by before we set off.

Accordingly, we had breakfast in the Ikea cafe- better, it must be said, than the ASDA cafe- and after getting a few bits and pieces from Screwfix including fur-lined rigger boots for boating, tried to return the carousel unit to Ikea.

It turns out that it was in two boxes, and we’d only brought one of them back. We resolved to leave the box at the returns desk to save carrying it around, and to return with the other box after dropping off our purchases back on the boat.

It was lucky we did, too, because we went slightly overboard with buying things, although we did have a £100 gift card from Ikea we got as a promotion for buying the kitchen from them. Amongst others, we got hanging rails for the kitchen, one to fit above the stove and dry wet clothes if needed, plate racks, drying racks, tea towels, some pots and pans… And, my particular favourite, some cotton bed linen with a waterways themed print, which if you squint could be a bridge on the South Oxford.

image

We hopped on the bus to return home, only to have it turn right and head down hill from Eastwood to Alfreton, rather than left to Langley Mill; the Rainbow 1 route, it turns out, has two end points, and we’d got on the wrong bus. We got off as soon as we could. To compound things, it started snowing heavily, and the thought of trudging back up the hill and down again to Langley Mill with three very large bags was a very unamusing thought, so treated ourselves to a taxi back to the boatyard, which was VERY cheap compared to Cambridge prices- but then, most things are!

Once back on board, I busied myself with various jobs whilst Amy went back to Ikea,a on the correct bus, to return the other box of the carousel unit and to buy a couple of shelves to fit a cabinet that we simply hadn’t been able to carry back with us. I set about mounting a new lock for the front doors. The existing rim sash lock was unreliable and so we had bought a Yale type night latch to replace it from Screwfix. This needed mounting on the left hand door, compared to the rim sash lock on the right, and I needed to drill a 32mm hole right through the door. I measured very, very, very carefully, several times, and measured again, to ensure that it was in the rig place! Such a large hole, in the wrong place, would have been pretty disastrous.

Luckily it went together well and, on Amy’s return, I was able to show her our new, securely locking front door. I much prefer integral locks with keys over padlocks, because a locked padlock on the outside of the boat tells any passing miscreants that the boat is empty and vulnerable, which you can’t tell a with a lock with a key.

Equally nerve wracking, I decided to try and test fit one of the LED lights on the mounting block in the kitchen. To do this, I had to use a hammer and chisel to prise several pieces of the cosmetic oak framing off, without damaging them, to run the wires underneath them. After using the multitool to trim a section out of the middle of one piece to accommodate the light fitting, I drilled through the back of another piece to run the cables to the miniature dolly switches. Because these LEDs draw only 0.15 amps, I was able to use these 25mm diameter switches that fit nicely onto the framing and look the part. Once mounted in place, and with the wires tucked away and the framing reattached, I think it looks very good.

image

image

image

The rest of the day was spent fixing in the kitchen units to their final positions in readiness for cutting the work top to fit them tomorrow, fitting and wiring various sockets and lights in the engine room, and generally doing little odd jobs.

Categories: Fitout, Uncategorized | Leave a comment

Fitout Day 11

Today we got up early to go to Langley Mill by train for what we hope was the last time, because next week we will begin to bring Willow home by canal and river!

image

image

When we arrived, the sun was shining for the first time in what felt like ages. For most of the day, we didn’t even have the stove on! So, what did we get done today? We insulated the bulkhead between the bedroom and the back cabin, I hung some of the old curtains to improve privacy and keep the light out early in the morning, and James started wiring up the batteries to the distribution board. James also put a fitting in a hole on the roof which had been for the wind turbine. We won’t be having one since we know that they’re no use on the Cam. As a simple solution he plugged the hole with a pump out fitting- that will confuse people since don’t have a pump out, but it is neat and we could actually use it for its designed purpose one day should we decide to. As it is we fall into the cassette camp in the age old debate! The fitting can also be used to feed the wire for a 12 v “cabin light” in addition to the tunnel light to help make navigating tunnels easier.

In the evening we went for our last curry at the wonderful Mehran. They were all very friendly and wished us luck – they remember us every time we go in and ask about the boat!

image

image

image

Categories: Fitout, Uncategorized | 9 Comments

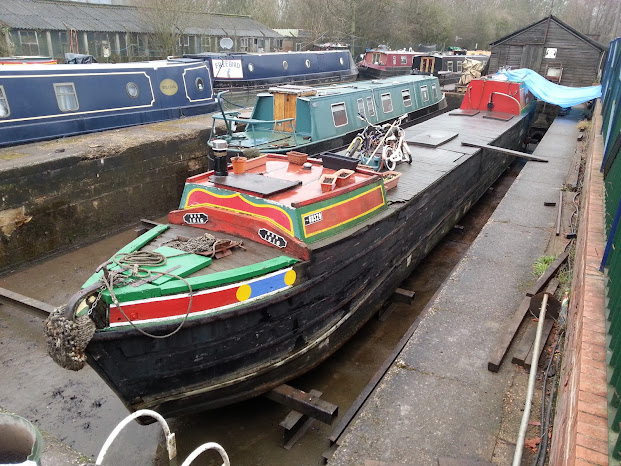
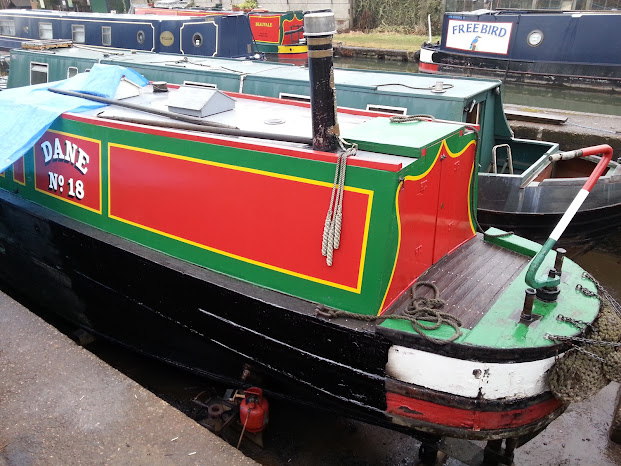
Other Severners: Motor Number 7, now named Dane

There is another Severn and Canal boat moored at Langley Mill, only this one s even rarer than Willow… And significantly older, being built in 1907.

Dane on dock at Langley Mill


When first built by Severn and Canal at Stourport in 1907, it was a wooden horse drawn boat called Bath. However, by the late 1920s, Severn and Canal wanted to modernise their fleet and, inspired by the motorboats that had been run by Cadbury’s and themselves, they set about converting several horseboats into motorboats with 15hp Bollinder semi diesel engines.

Motor No 4, sister ship to No 7, showing how it would have looked in working days. Picture originally from Cadbury’s, and reproduced in “Severn and Canal and Cadbury’s” by Alan Faulkner.

Bath was converted in July 1929, and was renamed Motor Number 7.


After carrying for S&CCCo, it was sold in 1948 to Thomas Clayton’s of Oldbury, for the grand sum of £1400. Clayton’s converted it into a tar boat, fitting the forecabin and decking over the hold to create a series of tanks to hold bulk liquids, like Spey and other tar boats.

Back end of Dane on dock at Langley Mill

Paired normally with wooden ex-LMS Station Boat Clara.


References

Faulkner, A. H., Severn & Canal and Cadburys, Robert Wilson, Rothwell 1981.

Faulkner, A. H., “Severn & Canal”, NarrowBoat Summer 2006, pp. 12-19.

Categories: Uncategorized | 4 Comments

Fitout Day 10

It continued to snow in the morning, which was rather annoying. Simon was going to try and come over and drop off the oven and a few other bits and pieces, but was worried about being able to get to the boat safely. Luckily it wasn’t too bad, and so he headed over to the boat.

Once he was here, we helped clear snow from a patch by the boat so that he could turn the car around, and then unloaded. We couldn’t offer tea, however, because the water taps outside had all frozen so we had nothing to fill our bottles from. The cooker, a fetching Spinflo Caprice in green, came in one piece with the oven, grill and hob, and it was 500mm wide. We’d bought an Ikea cabinet, which was designed for ovens 600mm wide, the standard domestic size, in the expectation of having to adapt it to fit the cooker.

It proved to be a very taxing problem. The cooker mounts are two horizontal rails, with holes for mounting, but they were too close together to sit on the metal brackets provided with the cabinet, so a new method was required.

We thought about the problem over a cooked brunch in the ASDA cafe, where the staff are worryingly starting to recognise us, and went to B&Q to get some wood and bolts.

The plan was to make a couple of wooden baulks to attach to the base of the unit, and mount the cooker itself on some bolts sticking up vertically, with the horizontal mounting plates on the cooker between two nuts, one at the top and one underneath, so the whole thing can be raised or lowered and adjusted to fit the work tops when they are put in, much like engine mounts allow the exact alignment to be adjusted.

2013-03-24 14.17.43

We measured the 50mm by 50mm wood we had bought, and cut two baulks to length. I drilled these through at 8mm to accept M8 bolts, and drilled a 10mm deep recess in the underside of the block with a 25mm hole saw, so that the heads of the bolts would be flush with the underside.

2013-03-24 16.06.29

These were then mounted in the oven, and after several test fittings, the frame made of e 50mm section wood was in place, and the cooker was sitting on the bolts.

We are slightly concerned about how hot the mountings will get, and so have resolved to leave the back off of the cooker cabinet so that they can be easily seen and felt when the oven is on, to ensure they don’t get overly hot. If they do, we’ll think of a new way of mounting it.

It took a great deal of time to mount the oven, especially when the M12 bolts that we were originally going to use didn’t quite fit, and had to be returned to B&Q and swapped for M8. This was the time when I really wished there was a Mackays ironmongery shop in Langley Mill, as it’s one of the most useful shops in Cambridge when buying nuts and bolts and has a far better selection, at a quarter of the price, as there is in B&Q. But, unfortunately, we are under a bit of time pressure and had to pay the premium for the convenience of getting them now. Luckily it’s only a 5 minute walk from the mooring.

We’ll be able to cut one of the spare sections of white board to fill in the gap next to the cooker. Eventually, the whole thing will be surrounded by a plywood half height bulkhead behind the cooker, going across the boat, with a small section to the side of the cooker. This will mean that pots and pans on the top of the hob can’t get knocked off by people passing by. We’ll probably tile the top of the bulkhead as a splash back, and put in 12v and 240v sockets, as it’s very easy to get to the back of it.

After a cup of tea (the outside taps having unfrozen when the snow stopped and the sun came out) we set about temporarily mounting the sink. We needed to do this because he tap, from the back of it, will foul the cabin sides where they slope in if the units are pushed right back under the gunwale. The run of units along that side need to be moved away from the wall, which will provide space for any other pipe work and cables that are required.

Test fitting the sink and tap showed that the gap required was 100mm, and so we cut some wooden blocks to screw onto the wall and then to screw the cabinets onto, so they are solid and can’t move, regardless of how much the boat moves.

Finally, I mounted the Whale Gulper shower pump, and ran the 19mm hose from the pump in the bathroom along behind the units to the skin fitting under the sink, attaching it to the wall at regular intervals. The bathroom sink and shower will drain into a sump, from where the Gulper pump will pump the contents through this pipe along the 4 feet to the 1 inch internal diameter skin fitting in the kitchen, which the kitchen sink will also drain through. This means we won’t have to install anymore skin fittings, and can, in the future, fit a seacock so that the hull can be made completely watertight to gunwale level, apart from the gas locker drain and the small drains for the well deck, should we decide to do anything crazy like cross the Wash, or do any serious river passages like the Thames tideway- or even take Willow back to it’s roots and visit the Severn and Gloucester docks.

After a tidy up and a sort out, moving the rest of the Ikea boxes into the bathroom and sorting out the detritus of instruction manuals, little polythene bags, and polystyrene blocks that you get with flatpack furniture, we headed off to the station to go back to Cambridge.

Categories: Fitout, Uncategorized | 1 Comment

Fitout Day 9

The past few weekends, we’ve travelled up to Willow on Friday night, on the first off peak train after work. This week we had a change of plan, for some good friends were having a birthday party on Friday night, with a fellow boater and his band playing, and so of course we had to go to the party. We were good, though, and left before midnight, as it would be an early start on Saturday morning.

And an annoyingly early start it was, with the alarm going off at 5.45 so as to make the early train we needed. The snow was falling thick and fast, and we had to just hope that the trains were running OK and that. Wouldn’t get stranded.

We wanted to bring several heavy items up to Willow, and so on Friday night before the party we had put the two heavy toolboxes that I needed on a sack truck, and the other bits for Willow- inverter, water pump, water filter, the new 14mm Hempex lines, and the shower sump- into a very large wheels hold all and left them at the garage, to be picked up en route to the station in the morning.

We had a bit of a wait at Ely, before getting onto the Nottingham train, and so fortified ourselves with tea and cheese and ham toasted sandwiches in the Costa cafe in the Tesco store next to the station, all the while worrying about the snow. It was very surreal to be wheeling a sack truck with several toolboxes on through Tesco, however! The trains worked perfectly, and we arrived eventually on time.

Once at Willow, we lit the fire and set to work. Simon had been machining some new solid oak window surrounds, to replace the existing ones which were looking a little lacklustre. They look very good too!

20130323-225150.jpg

Old window surround, new ones below.

image

Amy headed off to Screwfix to pick up the new vacuum cleaner, whilst I had a go at installing the water pump under the front step. There was space to mount it under the floor, with access through a large hole above. It is mounted onto wooden battens, which are themselves mounted onto an inch thick sheet of polystyrene, which with flexible hoses should hopefully cut down on the amount of noise it makes.

I finished off the plumbing for the Paloma water heater and installed the kitchen tap water filter. This will treat the cold water supply for the sink, to take away any taint from the tank. The tank itself, of galvanised steel, is in good condition, but using filtered water, I find, makes a better cup of tea, so of course we had to have one! It was a simple job to screw it to the wall and connect up the pipe work, leaving a stub for the kitchen tap to connect onto.

Once Amy returned, we sealed around the flue with high temperature black silicone, as the existing fire cement was cracking in places. We also assembled several of the kitchen units, and then found a snag.

The original plan was to have an L shaped unit in the corner between the kitchen and the galley, with a carousel of shelves inside to make use of the otherwise “dead” and inaccessible corner. However, whilst this design was fine on paper, when actually assembled, putting the oven next to it would have made the corridor past the kitchen far too narrow. There are various oak beams and protrusions, and it would have created a pinch point. After a lot of thought, we decided to adapt the cupboard. The side of the L that sticks out has been removed, and the end panel screwed in place. We will put shelves in the corner, and use it for pots and pans, with the most used at the front, and the least used at the back. I’ll put a 12v LED light in there, and the interior of the cupboard is white, so it should be relatively easy to extract things.

It’s very frustrating, but unfortunately that’s the nature of working in a boat. A design might be fine on paper, but there is often something sticking out in the way, or an unforeseen thing, that prevents the design working as well as you’d like. But that’s all part of the challenge.

Right, bed. It’s been an extremely long day!

20130323-224945.jpg

20130323-225114.jpg

Got to get some Solvol Autosol onto the flue to remove some of those stains!

Categories: Fitout, Uncategorized | 3 Comments

…and it even matches the boat!

Fitting out is a dirty, dusty business, and, as we’re trying to live on board part of the time, the boat needs frequent tidying up and sweeping to try and keep on top of the dust from ground-off tile adhesives, sawdust, cut off remnants of sealant or glue, ash and dust from the stove, etc etc etc!

We’ve borrowed a small Goblin vacuum cleaner from Simon, but decided to bite the bullet and get something a bit more industrial and suitable.

20130321-215630.jpg

Charles the wet and dry cleaner should do the job. We’ve wanted a decent, large vacuum cleaner for years on Lucky Duck, but never had the space to store one, or the power to run it. Dust from the solid fuel stove can be very annoying in the depths of winter. it getsEVERYWHERE a d sweeping it up just isn’t good enough, it always swirls some into the air and deposits it elsewhere. When deciding on the electrical system for Willow, an inverter large enough to power a proper vacuum cleaner was pretty high on the list. The 2kw (4kw surge) inverter we got, and which we will install this weekend, should allow us to clean properly. The ability to suck up wet spills should also prove invaluable. And, of course, there’s twice the amount of cabin space to keep clean- more if you count the engine room and the space that will become the back cabin- compared to Lucky Duck.

And the best thing about It? It (I can’t bring myself to call it a “he”, that would be a step too far) is that the colours match Willow perfectly, if I add a little bit of white lining with insulation tape….

I also can’t believe I just wrote a whole post about a vacuum cleaner. That is very very sad.

Categories: Uncategorized | 8 Comments

Fitout Day 8

20130317-190552.jpg

A reasonably productive day. Up at 8 with the sunshine (we really should fit the curtains!) after a cup of tea we started assembling the innards of the IKEA large cabinet we’d put together yesterday. This was a fairly convoluted task, as this corner cabinet has two shelves that via an arrangement of hinges and slides can be pulled around the corner and out into the kitchen, making use of the “dead” space.

Simon came around to drop off a few bits and pieces- the half inch gas fittings, ready (when new olives are added) to be used again where possible. He also dropped off the Paloma water heater, and lent us a set of pipe benders.

We retired to ASDA at 11am for a planning meeting over a cooked breakfast, and on our return cracked on with mounting the Paloma.

There is one section of the roof, 5 inches from the bulkhead, that has a cutout in the wood tongue and groove of the old cabin skin for the water heater flue to exit. However the steel over it hasn’t yet been cut, and we decided to save that job for a less rainy day! Drilling holes in the roof is quite momentous, and so we wanted to ensure we had the flue kit and Sikaflex ready to install it properly and prevent any drips.

Before we could mount the Paloma, we had to prepare the plywood bulkhead. We thought about painting it, but decided to bite the bullet and cut a panel from the supply of varnished oak ply to match the cabin sides of the boat. After measuring carefully several times, we marked up a sheet that had been water damaged at the bottom, and cut out the trapezium shaped piece to fit between our wall cupboard and the cabin side. Although the edges weren’t millimetre perfect, we’ll use some oak strips, stained to match the others, to edge around it and neaten up the edges. It’s not a bad job, though, and it matches the other panels nicely.

Once at was done, we made a set of wooden mounts for the Paloma. It needed to hang three inches further forwards for the flue to match the hole. An elegant solution might have been to move the bulkhead forwards again, but the radiator on the corridor side prevented this.

So we screwed on two vertical battens onto the bulkhead, and put a couple of horizontal strips across to mount the Paloma’s attachment points to. It took an age to get the mounting point at the bottom attached, because one of the screws had the posidrive head graunch up, so it had to be laboriously unscrewed with mole grips.

Eventually we changed tack and used some M6 bolts and washers instead to attach it. We’ll have to remove it when we fit the flue, and so wanted an attachment system that would work with this.

Once the Paloma was in the right place, I could get on with the plumbing. I’m using copper pipe for the feeds to the Paloma as it’ll be visible above the work top, and so I had fun trying to bend single lengths of copper to shape. I couldn’t quite easily make it work, so made short lengths with bends in to line up with the outlet and inlet on the Paloma, and used other lengths of pipe and two compression joining pieces to connect these to the cold and hot pipes under the gunwale. Not as elegant as a single length of unjointed copper, so they may one day be replaced.

I ran pipes through into the bathroom and blanked off the ends temporarily, so we’ll be able to use the water system before the bathroom is fitted.

I also ran a pipe along the bulkhead to the corridor, and put a stop cock on the end. This will be accessible through a small access hatch, and with a length of hose attached, will make draining the water system down for leaving the boat unattended in winter a lot easier, as this runs from the lowest point in the cold water system. I plan on running a similar pipe from the hot water side, after the Paloma, to make draining that down equally easy. It should be easy to put the hose into a bowl, open the stopcock, and drain it all down- that’s the plan, anyway!

20130317-190540.jpg

We finished off a few other little jobs, like running 12v cables to the cutout under the front step where the water pump will be fitted, and headed off to catch the Rail replacement bus (dreaded words!) to Nottingham and back to the Duck.

Categories: Fitout, Uncategorized | 4 Comments

Fitout Day 7: I came, I saw, IKEA (again)

Readers who’ve been reading our Lucky Duck blog since 2011 may well realise that I’ve recycled the title of this post, having used it before…. But it’s so good, I couldn’t help it!

After a very wet and rainy start to the day, Amy and I headed over by bus to the nearby Giltbrook retail park, home to Screwfix and Ikea. We walked part of the way into Eastwood to see what shops the were- including a useful hardware and storage box shop- but took the bus the rest of the way because of the rain.

Once in Ikea, which was mercifully empty compared to previous weekend visits, we made our way to the kitchen design area. We’d been up a couple of times already, and fiddled around online with their online design tool, and were pretty sure of the design we wanted- Lidingo off white doors if any one is interested-, so we were going to buy it to have it delivered the following weekend.

However, when it came to specifying the delivery, we hit a snag. Ikea deliver within 48 hours, but you have to be in the store in person to arrange the delivery. This would mean Amy leaving work early on Thursday, heading up by train, ordering it, and then returning- clearly madness!

Nevertheless the Ikea staff rallied round after we explained our problem, and we were told that, as everything was in stock apart from a couple of items, we could have it delivered later this afternoon, which we hadn’t bargained for at all! We had a think and quickly agreed, hoping we would be able to find space on Willow to store all the kitchen boxes.

After arranging the delivery we went over to Screwfix to collect a large plumbing parts order I’d made online on Friday before leaving work. I managed to order most of the things we needed to plumb in the boat, with the visible bits being done in 15mm copper pipe, and the bits you can’t see done in Speedfit for cheapness and convenience. We collected several large carrier bags of plumbing pieces, several 2m long lengths of copper pipe, and a large coil of Speedfit pipe. We also picked up a new hose reel, as it was on special offer.

Loaded down, we met up with Simon who had kindly arranged to give us a lift back to the boat, a d so we headed back. Back at the boat there was just time to talk to him about the blocks for the LeD lights that he was machining up, and a variety of other little bits and pieces he is making. We’re so luckily that he’s happy to make all these little detail pieces that I can’t, they’ll really enhance the look of the boat.

Once back, we made some fairly serious changes to the layout of the varnished oak faced ply panels in the saloon. We moved a couple around and put up some others so that the entire left hand wall of the saloon was covered for the first time. It made a very big difference to the look of the boat.

I made a start on the plumbing, and ran the main old water supply tithe kitchen, tee’d off for the tap, ran it along the the bulkhead, tee’d off for the Paloma heater, and put a temporary stop e d on in the bathroom. Amy then rang from ASDA where she had been getting lunch- the IKEA delivery was due in 20 minutes! Quickly I downed tools a d started the engine.

Willow’s normal mooring is accessible by car, just, but not easily by van. To save carrying the multitude of kitchen boxes a long distance, we moved the boat down to the lock, alongside the first and widest part of the access road, and moored in the lock. A stoppage a couple of locks down meant we weren’t expecting traffic, but soon could move if anyone showed up.

Threading the boat through a very narrow gap between moored boats- only a couple of niches wider than Willow- was slightly nerve wracking. But we didn’t scratch any paint, which was a relief.

Once at the lock, the Ikea van turned up and we were soon hard at work shifting the boxes and boxes and boxes of stuff to a large pile by the boat, to be stored away once the van had gone. After a solid 30 minutes of work, we had everything stowed away- although there’s a large pile of kitchen bits in he bathroom, and another in the bedroom, to clear space. We shifted lots of bits and pieces around and cleared a space in the kitchen to make a start on fitting a couple of cupboards. A long reverse past lines of moored boats took us back to the mooring, with only some gentle fended-off contact on moored boats.

After using the Bosch multitool to rout out a groove for the fridge cables, we were able to mount the first cupboard. This, on the bulkhead, will be the most important cupboard of all, as it’s where we’ll store the tea! A very good one to start with. It fitted together in no time, and was soon mounted solidly onto the bulkhead, and suspended from the solid oak cabin beam via long screws.

Although it was half past six by this point, we pressed on and decided to assemble another cupboard- one of the more complicated ones. This large unit is to go in the corner and incorporates sliding and swivelling shelves to make use of the “dead” space in the corner. I can really recommend Ikea style designs for making the most of small spaces, such as boat kitchens.

Finally we decided that it was time for a late tea of fish and chips, and now bed, ready to assemble more in the morning.

20130316-231622.jpg

20130316-231651.jpg

20130316-231733.jpg

20130316-231832.jpg

20130316-231841.jpg

20130316-232002.jpg

20130316-232019.jpg

Categories: Fitout, Uncategorized | 1 Comment

Soar Point

This email from the Canal and Rivers Trust arrived in my inbox yesterday, as I’ve signed up for stoppage notices for the route we’re planning to take. Given that Willow is a deeper drafted boat I was a little concerned. Halfie also kindly passed on the warning notice in case I’d not spotted it (thanks!)

Between Bridge 46 (A453) and Lock 58 Ratclffe Lock, Ratcliffe-on-Soar

Thursday 14 March 2013 until further notice
Due to high levels of rainfall this year, a silt bank has formed between the above locations.

This bank could affect deep drafted boats; however due to its variable nature we are unable to confirm the exact draft of boat that can pass.

Please approach the site with caution. 
Canal & River Trust apologise for any inconvenience this may cause

However, this is where the network of historic boaters comes into its own. I fired off a message to the Historic Narrow Boat club mailing list asking if anyone knew anymore about the site and if any deeper boats had been that way recently. A flurry of swift responses from various people who either knew the site or had been that way/seen others go that way recently fully loaded assured me that it was something to be aware of but not overly concerned about.

Image

Ratcliffe Lock (Photo: GeoLocation)

Categories: Uncategorized | Leave a comment

Create a free website or blog at WordPress.com.