Fitout

More Curtains

I’m now onto my third set of curtains with another pair cut and ready to sew. For the third pair I changed things a bit by switching to a different fabric for the bedroom curtains. Whilst the green Morris “Willow Bough” pattern is perfect for the living room, it wouldn’t look quite right in our burgundy and cream bedroom. Instead I used this lovely Habitat for V&A fabric, which my parents bought the end of a roll of sometime in the 90s to make a sofabed cover. Since then it has been used for various things, and it is nostalgic for me to find another use for it on Willow, as the pattern brings back happy childhood memories. With its curling foliage it’s not dissimilar to the Willow Bough fabric either.

It was here in the bedroom where the blackout lining I’ve used on all the curtains really has come into its own. With the old curtains, we had simply blocked the light out by pinning up a black cover over the window at night, but with these there is no need – compare with the last photo of the old curtains.

Just two more pairs to make now (and the door ones!)

2015-02-13 21.22.30 2015-02-13 21.25.09 2015-02-13 22.16.46 2015-02-16 09.07.23 2015-02-16 09.18.43

Categories: Fitout | 2 Comments

Getting the Hang of It

Once I had gathered all the necessary materials for my new curtains, I was keen to get started. I spent Saturday reminding myself how to thread (thanks YouTube!) and practicing using the Singer – it has a hand crank so one hand is needed to turn the mechanism leaving only one hand free to guide the fabric through. It used to have an electric pedal to control the mechanism but I wan’t sure if it would still work and I prefer being able to run it off-grid.

At first though, I thought it was broken because it kept skipping stitches and the ones it did manage were irregular in length. Again, the internet came to the rescue, and I read that this could be caused by something as simple as a blunt needle. I switched it for one of the new ones I’d recently bought (learning in the process that the design of the machine needle has barely changed for over a century, so that my 1931 machine could use the same needle as a modern one) and the result was perfect – even, neat stitches.

Once I felt confident using it, the next step was to cut the fabric up – possibly the most important step! When I was younger, making things in our Textiles classes at school, I used to be terrible at cutting things neatly, relying on seams to hide the wobbly edges, but I’ve now learned the value of accuracy! Without a large table (although I’m lucky that my drop leaf table is a pretty decent size) I found that the best way to cut the patterned fabric was the thread pull method – isolate one thread, and pull it so it bunches up and then when you flatten it out again it leaves a track through the fabric where it has shifted. This took a while to do but resulted in a very straight cut. The blackout lining was too tightly woven for this method to work so I simply drew lines on it using a straight edge and cut along them, which worked well enough.

Then it was a matter of pinning and sewing the two layers together and attaching the rufflette tab along the top, which was actually fairly straight forward (thanks again to YouTube tutorials!). I managed to make one on Sunday evening and another last night – once the fabric is cut it’s actually only about an hour’s worth of work (at my pace) to put one together, and I really enjoyed it. Only eight more to make… I’m sure the novelty will wear off but the resulting curtains will be worth it, I’m so pleased with these ones, the fabric is just perfect!

2015-02-03 09.31.04 2015-02-03 09.32.24 2015-02-03 09.32.52 2015-02-03 09.34.05

Categories: Fitout | 2 Comments

Curtains

2015-01-16 14.08.51

My next project is to turn this pile of fabric into new curtains for Willow. The existing ones are serviceable but I’ve always wanted to replace them with curtains made from William Morris’s “Willow Bough” fabric. It took me a while to find enough of it for a reasonable price on ebay (I couldn’t buy at the standard prices I’d found in fabric shops – upwards of £30/m).  Last year I serviced my Singer sewing machine and so now’s my chance to put it to use! I plan to re use the header tape from the existing ones and use them as a pattern then I will update once I’ve made some progress!

Categories: Fitout | 2 Comments

Fitout 50: Kitchen Baseplate cupboard

Not done any serious fitout work for a while, but recently we decided to tackle the offside in the kitchen, opposite the main worktops and sink. Previously there had been a radiator there, which meant we couldn’t install any cupboards on that side. However, it turned out to be a quick job to empty some of the anti-freeze solution from the system, remove the rad and blank off the stubs of pipe then replace the solution. With the rad gone, we were able to install the IKEA wall cuboard we’d bought for the space when we’d imagined the whole kitchen installation and ordered back when Willow was still at Langley Mill. However, before we did this, we got out the jigsaw and cut a hatch into the floor to access the baseplate and use the cool space down there as storage for food when the fridge is out of action due to lack of sunshine.

We didn’t have enough worktop left to make the counter, and it only comes in massive expensive lengths, so we are using repurposed IKEA “Lamplig” chopping boards to create a little bit of worktop space. Directly below that is an open shelf which has the hot pipe from the back boiler running through it (plate warmer!) then the cupboard is at floor level, so that the bilges can be accessed easily from the bottom of the cupboard.

The new worktop catches the winter sun, which makes it a very nice perch for one of the cats!

Next job its to tile along the gap between the worktop and the panelling, using some original 1930s tiles (salvaged from the house next to to the one I grew up in, and which were used around all the fireplaces in the development)

2014-11-14 16.59.45 2014-11-16 15.31.51 2014-11-16 17.14.11 2014-11-24 12.51.12

Categories: Fitout | Leave a comment

Fender Bending

We commissioned Willow’s stern fenders (known as tipcats) last year, from an old boatman called Joe Hollingshead. Sarah E collected them for us and we picked them up from the November HNBC social. Next step was to soak them and then hang them up in the garage.

On Sunday, we decided to have a go at fitting them. This is not an easy job, particularly as Willow’s stern end is very pointy. The first one was relatively easy. With one end attached we used a heavy duty ratcheting puller to being the other end around, in combination with a bit of bashing from a sledge hammer.

2014-07-06 16.55.17

2014-07-06 17.56.38

The first one securely fitted, we set about bending the second tipcat into shape. Doing it in situ proved difficult, so we made use of the same puller, a mooring pin and a convenient tree.

2014-07-06 19.07.46 2014-07-06 19.08.58

This one was more difficult to persuade into the correct shape, so whilst it it also now attached we need to fettle them a bit more and keep tightening them. One suggestion has been to try switching them over so I think we’ll try that. But they’re starting to look the part.

2014-07-06 19.54.00 2014-07-06 19.54.22

Categories: Fitout, Maintenance | Leave a comment

Counter Culture

This weekend, we decided to give Willow’s counter a bit of attention. First, we wanted to reduce the amount of ‘play’ in the tiller – previously if you moved the tiller there was a bit of a lag because the central stock which should have been a tapered square had worn down to something more rounded. First job was to grind down the blob of weld which held on the bolt, then remove the nut and the tiller arm completely. Those of you who have been reading our blogs for some years will remember that we’re no strangers to tiller removal, although this time it wasn’t a tree on the Nene but a deliberate removal with a 1″ spanner!2014-05-31 13.00.05-1


Then it was a case of cutting some steel strips to shim the rudder stock (and sanding/priming a few scratches and nicks while the grinder was out) before putting the “swan’s neck” back on, and securing it tightly onto the new steel shims with the top bolt. The result is that the rudder now responds immediately to movement with out any lag at all.

2014-05-31 13.49.47-1

Next, I got on with touching up some rust spots along the join between the cabin and the gunwales, whilst James got into the bilges under the counter. First he used Charles the wet vacuum cleaner to suck up the water, the cleaned and painted the stern gland bilge with Danboline.

2014-06-01 16.03.48-1

Whilst down there having a bit of a sort of the engine room, James was cleaning under the fuel tank (right at the back under the counter) and found an old penny. It’s a bit corroded but it’s possible to make out that it is a 1d piece from 1938, minted just three years after Willow was built. Traditionally boatmen used to set “lucky pennies” into their cabin steps so I wonder if it came out of an older step? We’re planning to set this one into the step. I love how old boats keep on surprising you!

2014-05-31 15.14.22 2014-05-31 15.15.00

Today, while James is away coxing at Peterborough regatta, I’ve continued working on painting the counter. Now, all four colours are retouched and it’s looking much better, although a certain tortoiseshell feline did leave a couple of paw prints on the black paint before I shut her in! Don’t want her treading any more paint through the boat!

2014-06-01 15.49.07-1 2014-06-01 15.49.33-1


Categories: Fitout, Maintenance | 2 Comments

Fitout 49: No Lyin’, we Switched the Wardrobe

(apologies to C.S Lewis and indeed John Pippin for the title!)

We bought a wardrobe for Willow from the ever-wonderful Emmaus charity warehouse back in July, and it had been languishing in the garage ever since. Up until now, we’d just had a bare rail to hang our clothes on.

Yesterday, James had made a couple of mini bulkheads to support/accomodate it since we were planning to remove the back panel in order to allow for more space inside, and make use of the under-gunwale space.

IMAG0250

Today we drove it home and carried it along from the car to the boat. I must admit to being unconvinced that it would fit!

IMAG0251


The next job was to remove the back panel. As you can just about see, the original design involved a front to back rail, and shelves down the sides.

IMAG0253

Carefully we carried it through the boat, and it amazingly fitted through all the doorways (OK, James did measure it but I was still unsure!). Now in the bedroom, with the back removed, the new rail could be fixed so that the clothes hang partly under the gunwale, allowing room for shirts and shorter dresses to hang, with space above for shelves.

IMAG0256

Here you can see the shelves installed

IMAG0258

It’s nowlooking really smart standing in the corner of the bedroom, with a couple of suitcases on top. And you can also see that we added a short rail between the wardrobe and the bulkhead to allow room for me to hang longer dresses! Ted, sitting regally on top is James’s first cuddly toy. The blue suitcase was £5 from Oxfam some time ago, and the grey one I found on the recycling shelf. It had a label on it showing that originally it belonged to someone from Bombay!

2014-04-03 17.35.52

2014-04-03 17.35.13

Categories: Fitout | 1 Comment

Fitout 47

At the weekend we decided to make a start on the paneling in the kitchen. On one side it is fine and doesn’t need replacing but the other side is water damaged. A part of the ceiling also needed replacing, and we want to put another light in. We used the new oak ply which came with the boat, and will stain and varnish it to match the rest. Once it is finished, we want to put up the hanging enamel pots from Ikea which we bought to store bits and pieces currently taking up space on the kitchen counters.

2014-01-19 12.24.19 2014-01-19 16.19.01


This is the Ikea storage system I mean. We bought the pale green pots instead of the white ones though.

Picture: Ikea

Categories: Fitout | 6 Comments

Fill ‘er up!

Willow’s water tank filler is just outside the front doors, and we’d been having problems when filling up using the hose that because the end of the hose didn’t go far into the tank, it needed to be held in place with a large weight to stop it coming out and splurting water everywhere. This meant that while the water tank was filling we couldn’t get in and out of the he front doors and had to use the side hatch.

So (inspired by a post on canal world) a few bits of plumbing fitting and some spare pipe later, we had a neat way of filling up. The hose plugs into the plastic fitting, and the large bore(22mm) copper pipe goes into the tank, with the ball valve in place to turn the water on and off. You plug it all into the tap via the long hose, with the valve in off position, turn on the tap at the wall, put it into the tank, then turn on the valve. No mess. Then, when it’s done, you can just turn off the valve to immediately stop the water flow, then turn off the tap. No running to the tap to turn it off because the water’s overflowed. And you can still use the front door. Win.

20140113-122430.jpg

On the way back from trying this out yesterday, we had a number of interesting situations to deal with. Firstly, winding the boat at the water point was very tight (we’re talking 6 inches spare), but thankfully that all went fine. Then, we needed to wind again to moor up pointing the right way. There was a strong stream running and this meant that Willow ended up slightly further downstream quicker than we expected, and got wedged completely between the two banks! Oops. All this with lots of rowing boats returning from a race, who were disgruntled at having to wait. Thankfully, some fellow boaters were passing and they, along with some passers by, lent a hand. James used the plank to lever the stern end away from the soft bank, which gave us the few millimetres we needed to free the fore end from the concrete wall and pull it round. It only took about 5 minutes in the end but it was stressful! We decided to give up on turning there and go a bit further out of town to wind, which we were able to do with no fuss. Then, on the way back in, we were passing under a footbridge which is half wrapped in scaffold, reducing navigation width. A traffic light system has been set up to prevent collisions, but the junior boys double which was coming the other way didn’t notice the light was red and came haring round the corner towards us, but luckily we were able to stop and let them pass. Still, although stressful, we were able to deal with them all without damage to Willow or sinking any other boats, so it could have been worse!

20140113-122756.jpg
Passing the Duck on the way back from the water-point.

We also met the new owners of the Duck at the weekend. They have done so much with it already, giving the boat a new lease of life! They’re keen cooks and so the Duck’s kitchen, already large for a boat its size, is even bigger, with a lovely Belfast sink and a five burner hob as well as an oven. It’s so nice to see it is in good hands. They also told us that like us, it was those beautiful curved doors which sold the boat to them!

Categories: Daily Life, Fitout, Maintenance | 1 Comment

2013: an historic year (Part II)

Continuing with our review of 2013, here are the final 6 months:

July
A busy, sunny and fun month, with lots of work done on Willow as well. We spent a glorious weekend sailing on the Thames barge Pudge with the Thames Sailing Barge Trust, for James’s birthday, which was excellent fun! We rowed and coxed the annual Town Bumps races, we went to the somewhat disappointing IWA national and we got the gas man to come and finish off the gas system so we could cook and shower in the comfort of our own boat! Never is a shower or a cup of tea so satisfying as when you’ve done most of the work to make it happen!
20140103-214214.jpg

August
August saw us frantically finishing off things so that my mum and her partner, Peter, would be able to stay with us for the weekend in relative comfort. Unfortunately we didn’t quite get the bathroom finished, but we did manage to get the solid oak floor down in the living room, which made a big difference, as did the bookshelves which James made. My mum and Peter arrived part way through our ‘Summer Pootle’, and we had some lovely weather! We met them in Ely, stayed overnight on the EA moorings near the Ship, then pottered up the Brandon Creek to drop them off. We always loving taking guests out because it helps us see the rivers through their eye, as a beautiful destination, not just a familiar backdrop that we’ve tired of. 20140103-215521.jpg

September
Back to school and university for both of us, but that didn’t stop us carrying on with work on the boat at weekends and evenings. I carried on with tiling bits of floor and James made the coat rail and shoe storage at the front of the boat. We went to the Shackerstone Family festival to see boats and boaters, where we picked up some presents for Willow: cheap ash trim and a brass toilet roll holder from one of the tat stalls! 20140103-220424.jpg

October
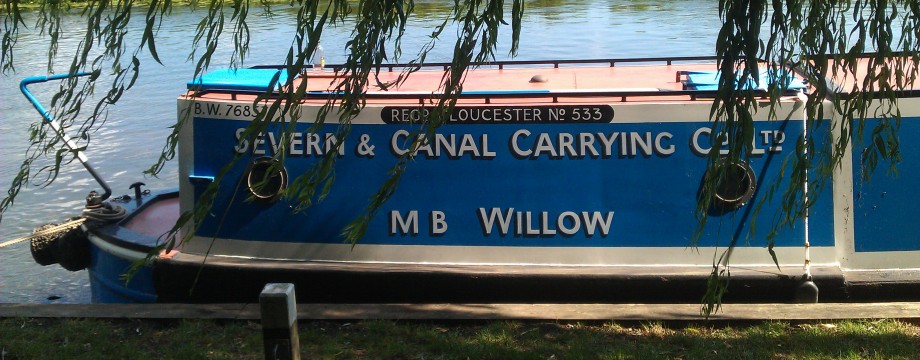
In October, we got stuck into researching Willow’s history, making contact with and eventually visiting the Waterways Museum and the County Archives in Gloucester. We visited Oak, Willow’s older sister, which is in very poor condition, and explored the city where Willow was based in her working days. We also found out a bit more about Willow’s work during the war, discovering that she was worked by the “Idle Women” for a time, and were kindly sent a photo of this- the earliest photo we have of the boat. We also had a great weekend staying on Ilford at That Fuller Do!
20140103-220953.jpg

November
The biggest excitement of November was buying our first car, Jasper the Fforde. This allowed us to go and do things that we hadn’t been able to before, like load up with a massive pile of logs for the stove, and collect cans of diesel from St Ives. In fact we spent a lot of time at the weekends, when we weren’t working on the boat, collecting various types of fuel for the winter and for propulsion! We finally finished the bathroom, and were very pleased with the result, ready for visitors who came for the bonfire night fireworks on Midsummer Common.20140103-221634.jpg

December
And so that brings us to December. We had a lovely Christmas break in the Westcountry, despite some terrible weather for driving. Over the course of the holiday, Jasper took us nearly 700 miles there and back!
20140103-222125.jpg

Now, not quite a year after setting eyes on Willow, we have a comfortable, spacious [its all relative!] home that we can be proud of. We’re not finished by any means but looking back has reminded me how far we’ve come! Here’s to 2014!

Categories: Daily Life, Fitout, Meta, Out and About, Rowing, Travels | Leave a comment

Create a free website or blog at WordPress.com.